

I sometimes use affiliate links in content. This doesn’t cost you anything but I may make a commission payment from anything you buy through these links. As an Amazon Associate I earn from qualifying purchases. All opinions remain my own.
There’s something deeply satisfying about walking past a rosemary bush, brushing your fingers across the needles, and catching that sharp, resinous scent. It’s the smell of Mediterranean kitchens and grandmother’s gardens, and it turns out you can bottle a version of it yourself with nothing more than a jar, some oil, and a little patience.
This guide walks you through three ways to make your own rosemary oil at home, what supplies you actually need, how to store your finished oil so it lasts, and — importantly — how to use it safely. We’ll also clear up a common point of confusion that trips up a lot of DIYers before they even get started.
Table of Contents
Rosemary-Infused Oil vs. True Rosemary Essential Oil: What You’re Actually Making
Before you gather your jars, it’s worth understanding exactly what you’ll end up with, because the term “essential oil” gets used loosely online and it matters for how you use your finished product.
True essential oils are produced through steam distillation or cold pressing, a process that pulls the volatile aromatic compounds out of a plant and concentrates them into a highly potent liquid. It requires specialized equipment and isn’t something you can replicate in a kitchen. What you’re making with the methods below is an infused oil, sometimes called a macerated oil, where a carrier oil slowly absorbs the plant’s aromatic and beneficial compounds over time.
That distinction isn’t just semantics. Infused oil is milder, already diluted, and generally gentler on skin, which actually makes it a lovely beginner-friendly project. It’s not concentrated enough to use in a water-based ultrasonic diffuser, though, since diffusers rely on essential oils dispersing in water rather than a carrier oil. If you specifically want rosemary oil for diffusing, our rosemary essential oil guide covers the true distilled version and how to source it. For scalp treatments, skin care, and homemade beauty products, the infused oil you’re about to make works beautifully.
What You’ll Need: Your Rosemary Oil Supply List
Before you start, gather these basics:
- Fresh or dried rosemary sprigs
- A carrier oil (olive, jojoba, or sweet almond oil are all solid choices)
- A clean glass jar with a tight-fitting lid
- A fine mesh strainer or cheesecloth
- A dark glass bottle for storing the finished oil
- Optional: a slow cooker or double boiler, if you’re using the hot infusion method
If you’re new to carrier oils and want to understand how each one behaves differently on skin and hair, our carrier oils guide breaks down the options in more detail. Jojoba is a good all-purpose pick if you’re not sure where to start, since it closely mimics skin’s natural oils and has a long shelf life.
Whatever you choose, make sure your jars, strainer, and storage bottle are completely dry before you begin. Any leftover moisture in your equipment introduces bacteria, which shortens the life of your finished oil considerably.
A Note on Amazon Kitchen Staples
If you don’t already have dark glass bottles or cheesecloth on hand, these are inexpensive, one-time purchases that make the whole process easier and extend the shelf life of your finished oil. This is a natural spot to link three or four specific Amazon products once you’ve chosen them: amber glass bottles with droppers, unbleached cheesecloth, and a set of wide-mouth mason jars.
Choosing and Preparing Your Rosemary
You have two options for your star ingredient, and each affects the outcome differently.
Fresh rosemary gives you a brighter, more vibrant scent, but the water content in fresh herbs means your oil is more prone to spoiling or growing mold if it isn’t handled carefully. Dried rosemary has a more concentrated aroma and, because the moisture has already been removed, produces an oil that keeps noticeably longer. If you’re making your first batch, dried rosemary is the more forgiving choice.
If you do go fresh, look for sprigs that are a deep, even green with no yellowing or wilting, and give them a gentle rinse followed by a thorough pat-dry — any remaining water droplets can invite spoilage once the jar is sealed. If you’re using dried rosemary, check that it still has a strong, distinct scent; herbs that have been sitting in the pantry for a year or more will have lost most of their aromatic punch.
Three Methods for Making Rosemary-Infused Oil at Home
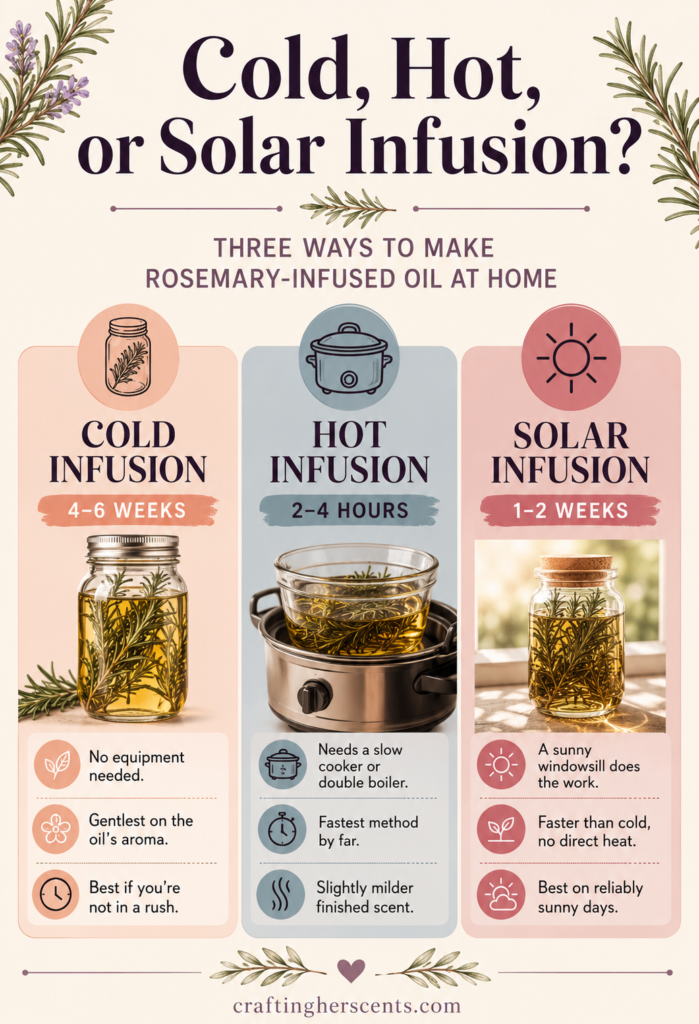
Each of these methods produces a usable rosemary-infused oil, but they differ in how long they take, how much the heat affects the final scent, and how much hands-on effort is involved. Pick the one that matches your patience level and your schedule.
1. Cold Infusion Method
This is the slowest method, but it’s also the simplest and preserves the most delicate aromatic qualities of the herb.
- Fill a clean glass jar about halfway with rosemary.
- Pour your carrier oil over the herbs until they’re fully submerged.
- Seal the jar tightly and give it a good shake.
- Store it in a cool, dark place for four to six weeks, shaking it every few days.
- Strain the oil through cheesecloth or a fine mesh strainer once the infusion period is complete.
This method requires no special equipment and is the gentlest on the plant’s compounds, but you’ll need to be comfortable waiting over a month for results.
2. Hot Infusion Method
If four to six weeks feels like a long time to wait, the hot infusion method gets you a finished oil in a single afternoon.
- Combine your rosemary and carrier oil in a double boiler or slow cooker.
- Heat on low for two to four hours, stirring occasionally.
- Let the mixture cool completely, then strain through cheesecloth.
The trade-off is that heat can subtly alter some of the oil’s aromatic compounds, so the scent tends to be slightly less nuanced than a cold-infused batch. For most home uses — scalp massage, DIY beauty products — that difference is negligible.
3. Solar Infusion Method
A middle-ground option that uses the sun to gently speed up the infusion process.
- Prepare your jar exactly as you would for the cold infusion method.
- Set the jar in a sunny windowsill or outdoor spot.
- Let it infuse for one to two weeks, shaking it daily.
- Strain and transfer to your storage bottle.
This method is faster than cold infusion without introducing direct heat, though it does depend on having reliably sunny weather, so it’s a better fit for some climates and seasons than others.
Storing Your Rosemary-Infused Oil
Once you’ve strained your oil, transfer it to a dark glass bottle right away. Light exposure breaks down the compounds in your oil faster than almost anything else, so a clear bottle will shorten its usable life considerably.
Store the bottle somewhere cool and dark, away from direct sunlight and heat sources like a stove or a sunny counter. Properly stored, a batch of rosemary-infused oil typically lasts six to twelve months. If it starts to smell off, sour, or noticeably different from when you made it, it’s time to discard that batch and start fresh.
How to Use Your Homemade Rosemary Oil
Scalp and Hair
This is the use rosemary oil is best known for. Rosemary has a well-documented reputation for supporting scalp circulation, and many people incorporate it into a weekly hair care routine by massaging a small amount directly into the scalp before shampooing. Since your infused oil is already diluted in a carrier oil, it’s ready to use as-is for this purpose, no additional mixing required.
Skin Care
Adding a drop or two of your infused oil to an unscented moisturizer or body oil gives it a subtle herbal note along with the skin-conditioning properties of whatever carrier oil you used. If you want to build more elaborate blends, our guide on how to mix essential oils covers ratios and pairing principles that apply here too, and rosemary pairs particularly well with sage in blends aimed at focus and mental clarity.
Around the Home
A homemade infused oil isn’t suited to diffusers, but it works well as a base for solid perfumes, cuticle oils, or wood polish for cutting boards and furniture. A little goes further than you’d expect, so start with small amounts and build up from there.
Safety Considerations Before You Start
Rosemary is a kitchen staple, which makes it easy to assume it’s completely risk-free in oil form, but a few groups of people should take extra care.
Before You Use Rosemary Oil
- Pregnancy: generally advised against — check with your doctor first.
- Epilepsy or seizure history: avoid or consult a physician; rosemary contains compounds linked to seizure risk in sensitive individuals.
- High blood pressure: use cautiously, as rosemary is a known circulatory stimulant.
- Everyone else: patch test on your forearm and wait 24–48 hours before broader use.
Source: NAHA general safety guidelines · craftingherscents.com
Rosemary oil is generally advised against during pregnancy, since some sources suggest it may stimulate uterine activity, and it’s best avoided without your doctor’s input. People with epilepsy or a history of seizures should also steer clear or consult a physician first, since compounds like camphor and 1,8-cineole found in rosemary have been associated with triggering seizure activity in sensitive individuals. Anyone managing high blood pressure should use rosemary oil cautiously as well, given its reputation as a circulatory stimulant.
For everyone else, a simple patch test goes a long way: apply a small amount of your diluted oil to the inside of your forearm and wait 24 to 48 hours, checking for any redness, itching, or irritation before using it more broadly. The National Association for Holistic Aromatherapy maintains general safety guidelines that are worth a read if you’re new to working with botanical oils.
Troubleshooting Common Issues
My oil doesn’t smell very strong. This usually means the ratio of rosemary to carrier oil was too low, or dried herbs had already lost potency before you started. Try repeating the infusion process using the same oil with a fresh batch of rosemary for a stronger result.
I see cloudiness or mold in my jar. This is almost always caused by residual moisture, either from fresh herbs that weren’t dried thoroughly or from equipment that wasn’t completely dry. Unfortunately, there’s no salvaging a moldy batch — discard it and start again with extra attention to drying everything beforehand.
How long can I keep it before it goes bad? Six to twelve months is typical for a well-stored batch, though this varies depending on your carrier oil. Oils like jojoba have a longer natural shelf life than something like sweet almond oil, so your choice of carrier affects storage time too.
Bringing It All Together
Making your own rosemary-infused oil is a low-cost, low-effort way to bring a little more intention into your self-care routine, whether that means a weekly scalp massage or a homemade gift for someone who loves natural beauty products. Pick the method that fits your schedule, be patient with the process, and store your finished oil properly so you get the most out of every batch.
Want a printable version of these three methods to keep by your kitchen counter while you work? Grab the free recipe card below and pin it for later.
Continue Your Journey
If this is your first time working with botanical oils, our essential oils for beginners guide is a helpful next stop for building out your basic toolkit. Curious how rosemary compares to other aromatic herbs? Our essential oil categories guide breaks down how different plant families are typically grouped and used. And if hair and scalp care is what brought you here, thyme essential oil is another herb worth exploring for similar benefits.
What method are you trying first — cold, hot, or solar? Let us know in the comments, and subscribe for a new DIY tutorial every week.


Thank you for this great information. New to all this, but this seems easy enough. Chocolate teapot…lol